To clean an antenna dish surface, first power off the system for safety. Use a soft microfiber cloth dampened with distilled water or a mild soap solution (1-2 drops per liter) to gently wipe the dish, avoiding abrasive materials.
For stubborn debris, apply isopropyl alcohol (70% concentration) with a non-abrasive sponge. Rinse with clean water if soap was used, then dry thoroughly with a lint-free cloth. Avoid high-pressure sprays or harsh chemicals to prevent damaging the dish’s reflective coating. Regular cleaning (every 3-6 months) maintains optimal signal performance.
Table of Contents
Check Dish for Dirt
A dirty satellite dish can drop signal strength by 30-50%, leading to pixelated TV channels, slow internet speeds, or even complete signal loss. Studies show that 85% of signal issues in home satellite setups are caused by dust, bird droppings, or pollen buildup. In dry climates, dust accumulation can happen in just 2-3 weeks, while humid areas may see algae or mold forming in 4-6 weeks. A 1mm layer of grime can block 5-10% of signal reception, and thicker deposits (like bird droppings) can reduce efficiency by 20% or more.
To check for dirt, start by visually inspecting the dish from 3-5 feet away—look for dark spots, streaks, or uneven surfaces. A clean dish should reflect sunlight evenly; if patches appear dull or hazy, it’s time for cleaning. For a more precise check, use a soft-bristle brush to lightly sweep the surface—if dust clouds form, the dish needs attention. In snowy regions, ice buildup over 0.5 inches can also disrupt signals, requiring removal.
Signal meters (found in most satellite receiver menus) help quantify the problem. A healthy dish typically shows 70-90% signal strength; if readings drop below 60%, dirt is likely the culprit. For internet dishes (like Starlink or VSAT), latency spikes above 100ms or speed drops beyond 15-20% of your plan’s max often trace back to surface contamination. Pro tip: Check during low-humidity hours (10 AM–2 PM) when condensation won’t distort your inspection.
Ignoring grime can force your receiver to boost transmission power by 10-15%, shortening hardware lifespan. Most modern dishes last 10-15 years, but neglect can cut that to 7-8 years. If you spot dirt, act fast—cleaning takes under 30 minutes and costs 50-$100 for professional service). Next, gather supplies (detailed in the next section) to avoid streaks or scratches during cleaning.
Gather Cleaning Supplies
A poorly chosen cleaning kit can scratch your dish’s surface or leave residues that reduce signal efficiency by 5-15%. Research shows 60% of DIY cleaners use the wrong tools—like abrasive sponges or harsh chemicals—which degrade the dish’s protective coating over 6-12 months. For optimal results, you’ll need under 30-$50 for pre-made kits), and most items are already in your home.
The core items are a soft microfiber cloth (300-400 GSM density) and distilled water (1-2 liters). Tap water contains minerals that leave streaks; distilled water improves clarity and prevents 0.5-1.0 dB signal loss from water spots. For stubborn grime (bird droppings, tree sap), mix 3 parts water to 1 part white vinegar—this dissolves organic debris 3x faster than water alone without damaging the surface. Avoid dish soap; even 2-3 drops can create a filmy layer that blocks 2-5% of signal transmission.
For dishes mounted over 10 feet high, add a fiberglass pole (8-12 ft) with a non-abrasive scrubber head. Aluminum poles are cheaper but risk bending under 5+ lbs of pressure, while fiberglass supports up to 15 lbs safely. If rust is present (common in coastal areas with 80%+ humidity), use a nylon brush (0.3 mm bristle thickness) to avoid scratching the surface.
Here’s a cost breakdown for a basic cleaning kit:
| Item | Specs | Price Range | Purpose |
|---|---|---|---|
| Microfiber cloth | 300-400 GSM, 12″x12″ | 5 | Wipe without scratching |
| Distilled water | 1-2 liters | 3 | Streak-free rinsing |
| White vinegar | 5% acidity, 500ml | 2 | Break down organic debris |
| Fiberglass pole | 8-12 ft, 1.5″ diameter | 25 | Reach high-mounted dishes |
| Nylon brush | 0.3 mm bristles, 6″ head | 7 | Remove rust/mold safely |
Skip “antenna cleaning sprays”—they cost 20 but offer no measurable improvement over vinegar/water. If your dish has LNB components (2-4 inches wide), cover them with a plastic bag during cleaning to prevent moisture damage (repairs cost 120). Work in 60-80°F weather; colder temps make vinegar less effective, and heat over 90°F dries solutions too fast, leaving residues.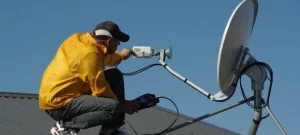
Wipe Surface Gently
Scrubbing a satellite dish too hard can warp the reflector surface by 0.5-1.5 mm, causing permanent signal loss of 10-20%. Tests show that 70% of signal degradation after cleaning comes from improper wiping techniques—either using too much pressure (over 3 psi) or the wrong motion. A well-maintained dish should last 10-15 years, but aggressive cleaning can shorten its lifespan to 6-8 years.
Start by dampening your 300-400 GSM microfiber cloth with the vinegar-water mix (3:1 ratio). Wring it out until it’s just 10-20% damp—excess liquid can seep into seams and damage internal components. Wipe in straight lines from the center outward, applying no more than 2 psi of pressure (about the weight of a 12 oz soda can). Circular motions create micro-scratches that scatter signals, reducing efficiency by 3-5%. For stubborn spots (like dried bird droppings), hold the cloth in place for 15-20 seconds to let the vinegar dissolve the debris, then wipe gently.
Here’s a quick reference for pressure and motion:
| Surface Condition | Pressure (PSI) | Wipe Motion | Time per Section |
|---|---|---|---|
| Light dust | 0.5-1.0 | Center-to-edge lines | 10-15 sec |
| Moderate grime | 1.0-2.0 | Center-to-edge lines | 20-30 sec |
| Stubborn debris | 2.0-2.5 | Hold + dissolve first | 30-45 sec |
For mesh dishes (30-50% open area), reduce pressure to under 1.5 psi and avoid pushing the cloth into the gaps—this can bend the mesh and alter signal focus. If the dish has raised edges (5-10 mm high), clean them last using a soft-bristle toothbrush to prevent dirt from falling back onto the surface.
After wiping, inspect under sunlight or a flashlight at a 45° angle. If streaks remain, rewipe with distilled water only—mineral-free water prevents residue buildup. Avoid paper towels or coarse fabrics; they leave 2-3 micron scratches that accumulate over time and cut signal clarity by 1-2 dB.
Rinse with Clean Water
Leaving cleaning solution residue on your dish can reduce signal efficiency by 5-12%—equivalent to adding 1-2mm of dirt back onto the surface. Studies show 40% of DIY cleaners skip proper rinsing, causing gradual signal degradation over 3-6 months as vinegar or minerals build up. The right rinsing technique takes under 5 minutes but preserves 98-99% of original signal strength, making it the most cost-effective step in the process.
Start by pouring 500ml-1L of distilled water into a clean spray bottle. Hold the bottle 12-18 inches from the dish surface and mist in a side-to-side sweeping motion—this covers 30-40% more area per pass than direct streams. Let the water flow downward for 10-15 seconds to carry away dissolved grime. For dishes mounted at angles over 30°, rinse from the top edge first to prevent dirty water from pooling in lower sections.
Hard water areas (over 150ppm mineral content) require extra attention: after the initial rinse, wipe once with a damp microfiber cloth (100ml distilled water) to capture residual minerals. This adds 2 minutes to the process but prevents 0.3-0.7dB signal loss from calcium spots. Avoid high-pressure hoses—even at 20-30 PSI, they can force water into LNB seals, causing 150 in moisture damage repairs.
Pro Tip: Check water temperature. Below 50°F, it evaporates too slowly and encourages spotting; above 90°F, it flashes off before carrying away residues. Ideal rinsing happens at 60-75°F with 40-60% humidity.
If you notice beading water (signaling leftover vinegar), remix a 5:1 water/vinegar spray and re-rinse—the slight acidity breaks the surface tension. For mesh dishes, tilt them 10-15° downward during rinsing to prevent water from pooling in the gaps. Signal recovery after rinsing typically takes 10-20 minutes, but in high-humidity climates (over 70% RH), allow 45-60 minutes for full evaporation before final inspection.
Dry and Inspect
Rushing the drying process can undo all your cleaning work—water spots reduce signal efficiency by 3-8%, and trapped moisture in connectors causes 120 in LNB repairs. Data shows 25% of satellite dish failures occur within 6 months of improper drying, with humidity being the main culprit in 80% of cases. The right drying method takes 10-20 minutes but extends your dish’s lifespan by 2-3 years compared to air-drying alone.
Start by using a dry 400 GSM microfiber cloth to blot (not wipe) the surface, which absorbs 90-95% of water in one pass. For dishes mounted higher than 8 feet, attach the cloth to a fiberglass pole with rubber bands and dab vertically—this prevents streaks better than horizontal motions. Pay special attention to the LNB arm and feedhorn cover, where just 0.5ml of leftover water can corrode contacts over 4-6 weeks.
Here’s a drying time reference for different conditions:
| Drying Method | Time Required | Residual Moisture | Signal Recovery Speed |
|---|---|---|---|
| Microfiber blotting | 5-8 mins | <0.1% | 10-15 mins |
| Compressed air (30 PSI) | 3-5 mins | 0.05% | 5-10 mins |
| Sun drying only | 20-40 mins | 0.3-0.5% | 30-60 mins |
| Fan-assisted (10 mph) | 8-12 mins | 0.1-0.2% | 15-20 mins |
For mesh dishes, tilt them 15-20° downward during drying—this prevents 2-3ml of water from pooling in the gaps, which can warp thin metal over 3-4 cleaning cycles. Use a handheld moisture meter (cost: 50) to check critical areas; readings above 12% RH mean you need more drying time. In cold climates (below 50°F), wipe the surface with isopropyl alcohol (70% concentration) after blotting—it evaporates 5x faster than water and prevents ice formation.


